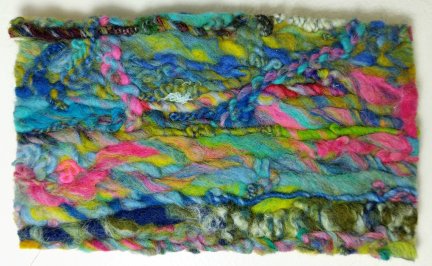
...then cut it in half and used half for each card. I needlefelted some scrim and other bits n bobs on including some silk threads and odds and ends from my scrap tray that I keep on my worktable where all the tiny bits end up instead of the bin!
Posted on Friday, 31 March 2017 at 05:15 PM | Permalink | Comments (6)
Lyn
Last year I took part in a one-day 'Easy Way to Paint' acrylic workshop - the tutor had developed a fool-proof way of using acrylic paints to make grasses and flowers so that everyone in her class went home with a pretty painting - just the kind of class I like!
Here's my finished canvas from the workshop:
Lots of amateurish daubs and splatters but it was great fun to do and I like the colourful, happy picture.
It's been cheering up my craft room all winter and I've been inspired by it to make a felty version - it's wet and needle felted with the brightest wool colours I have and it's stitched to white mountboard and has a white frame. The felt is approx 43x35cm (17"x14").
So it's down with the autumn/winter picture in my hallway and up with the spring/summer one!
Posted on Sunday, 26 March 2017 at 04:50 PM | Permalink | Comments (14)
"filzfun" magazine is packed with diverse articles of interest to felters worldwide. In the current issue you'll find: Judit Pocs (felt artist), Lisa Klakulak (Stongfelt), Terese Cato (needle felter), Stefanie Holzgrawe (felt urns) and many more.
Here's our copy of 'filzfun' with the English supplement - we were thrilled to see Annie's embroidered felt on the cover.
We were pleased to be asked by the "filzfun" editor to write a tutorial for felters who wanted to make 'something a bit quirky', and as it was to be for the issue being published in late February, our thoughts were of melting snow and delicate spring flowers.
We played around with ideas and prototype pieces of felt to design a 3D table runner. It's mostly made by wet felting but needle felting was essential in the final stages. You can get an idea of scale from the photo below ... yes, it's posed, we weren't actually using those felting needles because we'd finished the piece!
We like the reflections created by the flowers when the runner is placed on a polished table...
...and we reckon that variations on this theme would be fun to try!
Posted on Monday, 13 March 2017 at 05:15 PM | Permalink | Comments (10)
Lyn
Almost two years ago, I made a felt fish bowl ...
... and I've been very happy with it, however the fish must have been restless because they made a break for freedom - but I managed to catch them all!
When I made the original piece of felt for the fish bowl, I made one side more deeply coloured than the other so the fish above are a nice mix of both deep and paler colours.
My plan was to make a mobile with the fish and a coaster from the bowl's centre. I showed my idea to my friend Joan and she suggested that I use the bowl's centre as the top of the mobile from which to suspend the fish. Why hadn't I thought of that?
So I played around with threads and started to make the mobile, but I wasn't happy with it. I took a photograph to view on my monitor because sometimes it's easier to see your mistakes that way, and I don't know what made me do it, but I rotated the photo 180 degrees.
And that's how I got the idea for the sculpture.
The fish are firm because I fulled the felt completely then applied free motion stitching so I only needed some lightweight wire on them. Here's a close-up of the wiring:
I also made a few stitches where necessary to keep the fish together.
I suspended the felt, on a nail in my wall, by using the wire on the back of the fish. It made a lovely wall panel!
I was reluctant to take it down but I had the bit between my teeth so I pressed on. I added more wire and found that I could fashion the school of fish into various shapes so that I could have made different sculptures had I wanted to.
I made the base by wiring the bowl's centre to a metal jar-lid and my husband helped me to fix a metal rod into it.
I loved working on this project - it's satisfying when your original idea morphs into something you hadn't set out to make!
Posted on Sunday, 19 February 2017 at 06:10 PM | Permalink | Comments (10)
'View From a Window'
Lyn
The current challenge on The Felting and Fiber Forum is to make a felt picture in the style of the Fauvist period - Fauvist paintings have a simplified drawing and an exaggerated use of colour.
I searched the internet for art from the Fauvist period and found that I quite liked the painting below by Henri Matisse, 'The Open Window', so the felt picture above is my take on it.
My felt picture was made mostly by wet-felting using dyed merino wool, and the glass vase is a little piece of open weave fabric felted in. The flowers, curtain track and opening-window frames are needle-felted in using yarn, then free motion stitching defined the curtains and interior window frame. The picture measures 50 x 36cm (20" x 14") and I stitched it to a pale blue stretched canvas.
............
Recently Annie and I found a couple of nifty things in 'Ikea' to help with our felting. We've been using a flat grater to grate hard bars of olive oil soap to make our soap solution, but it's not easy and we often grate our finger nails along with the soap! We bought a rotary grater for just £4 ($5)...
... and it's brilliant. It will even grate those annoying little chunks that fall away and are impossible to grate on a flat grater. We used the fine rotary wheel and found that the resulting soap 'powder' was quick and easy to make and very easy to dissolve in water.
We also found this airer for £5 ($6.25) - it folds flat for easy storage. The rails are 79cm (31") long and ideal for drying wet-felted pictures. We put cross-stitch plastic canvas on the rails to fully support wet felt...
...and it's useful for drip-drying felt-making equipment!
We find it hard to look at anything without wondering if it could be useful in our craft rooms!
Posted on Friday, 10 February 2017 at 10:23 PM | Permalink | Comments (8)
Work In Progress
Annie
Firstly, a belated Happy New Year to everyone :)
I've decided that now that the plastering is all done and we'll soon have freshly painted walls, I want to make some flowers or landscape pictures for the house. Maybe some accessories too. The picture above is a small sample (one of many to come) to flesh out some ideas.
Posted on Thursday, 26 January 2017 at 09:59 PM | Permalink | Comments (8)
Merry Christmas from me and mum!
Annie
I haven't thought much about Christmas this year because the last few months have been largely taken up with replastering, rewiring and generally fixing up my house a bit. I've waited 11 years to do it but we're finally getting there and all the woodchip wallpaper has gone! Yay!
That has all taken up an awful lot of time but I wanted to make at least one Christmas decoration, and so I made a little picture of a pudding to hang up.
I didn't know that was what I was going to make, I had no plan but started by stitching a little Christmas pudding to see where it took me. I had thought it might look cute if I stitched lots of them and made some musical notes out of them but I only got as far as making one before I changed my mind! I cut it out of the calico it was stitched onto and restitched it on to a piece of experimental handmade felt that I made a few weeks ago using various bits of scrap fabric that I wanted to try out (once I made it I thought I would use it for a few mini landscapes but again I changed my mind!).
I hand stitched a little badge saying "Figgy Pudding" and tacked it on. It looked a little bare at this point so I couched a bright yellow thread around the outline of the pudding and added some white french knots to liven it up and look a bit like snow. Lastly I added some beaded trim around the edge.
The little frame is actually a Christmas sign that I bought. It says "Naughty or Nice?" which is now behind the pudding, but I only bought it for the frame :) As I was working I tacked a black outline around the square that I would then cut out to fit into the frame to make sure I was working within the size of the frame.
Here are a couple of pics of the experimental bit of felt I made before I stitched on the pudding and cut out the square. I tried a few things out like cutting little flowers out of fabric and felting them in and felting in various new yarns and other bits n bobs like crochet chains. I also felted in some bright pink plastic tutu netting under some open weave fabric which gave quite a nice effect. Such fun! It's only a small piece but I tried out lots of things.
The decorating schedule has meant we've been on a furniture merry go round for a couple of months, always having to get things from one room to another to make room for the next thing. Next time I think that decorating four rooms plus the hallway and landing all in one go is a good idea, please do correct me! It's a terrible idea! Anyway, on one day there was a sofa and various other things blocking the doorway to my craft room and all I had to fiddle with was some copper wire that the electricians had discarded so I made the outline of this little tree. I later then filled it in with finer copper wire and some colourful beads. I think it's rather cute at only a few centimetres tall.
We hope you found some crafty time in the run up, and wish you all a lovely Christmas. x
Posted on Saturday, 24 December 2016 at 09:16 PM | Permalink | Comments (8)
Lyn
Back in the summer I bought two strings of led silver wire lights and I used one set inside a decorative glass bottle. I put the other set by for Christmas with a vague idea of incorporating it into a piece of felt.
Well, just over a week before Christmas and the set of lights was still untouched on my projects pile. So I looked around for inspiration and spotted the bright red amaryllis we have indoors for Christmas...well actually we have a pot with several very tall green shoots in it but it will be lovely when it blooms.
I thought about simply wrapping the string of lights around the pot but it's a dull colour, so I made a piece of felt that the pot could sit in. I used merino wool in three shades of green: olive green at the bottom, pistachio green in the middle and spring green at the top - finished height is 8" (20cm) - and this is the shape I cut to wrap around the pot.
I stitched the wire of lights to the felt using "Bottomline" pale grey thread - it's a very fine thread so stitches aren't noticeable unless you look closely.
I closed the back with cross stitches using three strands of embroidery thread. In the photo below you can see that the battery pack sits at the back of the pot on the shelf.
The wrap looks good too without the lights.
And here's another view of the lights - I just turned the pot slightly to view from a different angle.
Posted on Sunday, 18 December 2016 at 11:02 PM | Permalink | Comments (14)
Lyn
I popped down to my local fabric shop to buy one thing and as usual came out with a bagful of goodies! I also came away with the above idea for quick and easy Christmas bunting - no sewing! It's simply triangles of Christmas fabric cut out with pinking shears then pegged to some string with mini-pegs usually used for card making. You could use handmade felt or thick wrapping paper instead of fabric and ribbon instead of string.
Posted on Sunday, 11 December 2016 at 09:25 PM | Permalink | Comments (8)
Lyn
For my Christmas card this year, I wanted an image of a partridge sitting in a pear tree with the first line of the song written along a branch, so I sketched out my idea several times until I was happy with the composition.
I decided to applique silk onto calico - the silk frays like mad but I like the effect. The eagle-eyed amongst you will spot a stray tuft of thread on the leaf, top right, that I didn't notice when I took the photo!
I used iron-on fusible webbing to make a mini quilt by sandwiching some thin cotton batting between two layers of calico, then I stitched an A4 sized frame to work within. The tree branches and writing were stitched before the brown partridge shape was stitched into place.
I added a white piece of silk for his face, then I worked on the eyes next because unless I could get them right the whole piece wouldn't work. I used black thread to machine stitch the pupils and a polyneon orange for the irises. I added the glint by hand but I had to use pliers to pull the needle back and forth as the machine stitching through the quilt was really solid.
After the eyes it was plain sailing and I added all the other silk shapes as I'd planned on my sketch.
I cropped the photograph then added a red border - I used a free photo editing programme "PicMonkey".
The wording inside the card will be:
"On the first day of Christmas my true love gave to me
A partridge in a pear tree.
Very nice ... but I'd rather have a box of chocolates!"
I bet you couldn't read the first two lines without singing them in your head!
Posted on Friday, 11 November 2016 at 07:33 AM | Permalink | Comments (2)